Reading the River: A Paddler's Foundation
Every river tells a story if you know how to listen. Water moves in predictable ways governed by gravity, friction, and the landscape it flows through. Learning to read these patterns is what separates a safe paddler from one who gets surprised by a feature they didn't see coming. When you can identify what's ahead (a hole, an eddy, a pour-over, a tongue), you can plan your line, brace yourself, or decide to portage. This skill doesn't require expensive gear or fitness; it requires attention and understanding.
The stakes are real. Thousands of paddlers run whitewater every year; the ones who travel without incident aren't just lucky, they're literate. They've learned to recognize water features the way a driver reads road signs. This guide walks you through the hydraulics that shape whitewater, the formations you'll encounter, and how to spot them before you're in the middle of one. You don't need to be an engineer, just observant and curious about how water actually behaves.
How Water Flows: The Physics of Whitewater
Water is lazy and efficient. It follows the path of least resistance, which means it accelerates where terrain forces it into a narrower channel and slows when it spreads out. This principle underpins every hydraulic feature you'll see on a river. When a river hits an obstacle (a rock, a ledge, a constriction), the water has to go somewhere. Some of it piles up, some of it drops, some of it circulates back on itself.
Current speed is the engine of every hydraulic. Fast water means more energy, sharper features, and bigger consequences. A hole that's mellow at medium water becomes a churner at high water. Conversely, a challenging rapid might vanish entirely at low water, leaving only rocks exposed. This is why gauges matter. The USGS maintains flow data for thousands of rivers; checking the current level before you put in gives you critical context for what you'll encounter. A "Class II" rapid at 500 cubic feet per second might be Class III or IV at 2,000 CFS. The shape and angle of the river bottom also matter enormously. Bedrock channels create sharp, defined whitewater; sandy bottoms produce more diffuse, shifting features.
Reading Holes and Reversal Zones
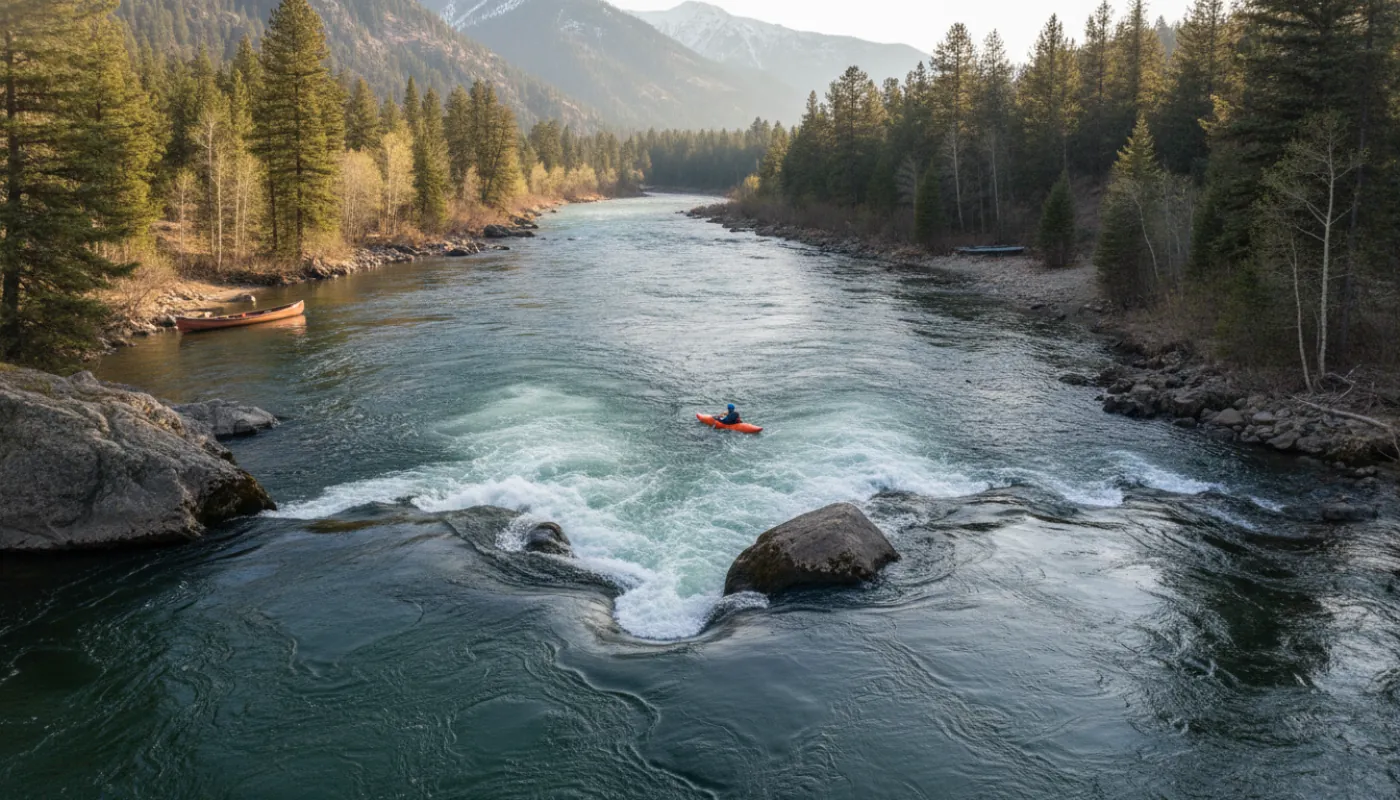
A hole (or hydraulic) forms when water pours over an obstacle and recirculates back upstream on the surface. The violent curl of water that results can trap paddlers, but understanding how a hole works helps you navigate or avoid it. The key insight: the upstream recirculation is strongest in the center of the hole and weakens toward the edges. Paddlers often escape a hole by driving hard toward the side, breaking free of the recirculation and into the downstream current. If you come out of your boat in a sticky hydraulic, the counterintuitive move is to tuck, ball up, and swim down to reach the outflow running downstream beneath the surface recirculation, and to get formal swiftwater rescue training before you ever need it.
Not all holes are traps. A small, sloppy hole might barely slow you down. A tight, powerful one can stop and flip you if you're not ready. The difference lies in the ratio of the obstacle height to the water depth and the current speed. A 2-foot drop in 4 feet of water with fast current is far meaner than the same drop in 10 feet of water at half the speed. Watch holes carefully from shore before paddling through. If water is boiling violently and the recirculation is clearly strong, consider going around or portaging. Never assume you can punch through a hole you haven't studied.
Eddies and Current Breaks
An eddy is one of a paddler's best friends, it's a pocket of slow or upstream-moving water found behind obstacles in the river. Because water wants to continue downstream but can't due to the obstacle, it reverses direction locally, creating a calm zone you can use to rest, scout, or plan your line. Eddies form behind rocks, behind the inside of sharp bends, and below pour-overs.
Identifying eddies means understanding obstacles. Any rock large enough to cause significant flow disruption will produce an eddy on its downstream side. The larger the rock and the faster the current, the larger the eddy. Eddies also have a boundary called an eddy line, where the upstream-moving eddy water meets the downstream current. Crossing this boundary sharply (especially if you're going fast) can flip you if your boat isn't edged and your body is off-balance. The rule is to lean and edge into the turn, downstream when you peel out of an eddy into the main current, but into the eddy when you enter one; leaning the wrong way is a classic beginner flip. Eddies get bigger and more stable in faster current and deeper water. In slow, shallow water, eddies may be barely noticeable; in class IV rapids, they can be your lifeline for safety and rest.
Current Lanes and Tongues
Every rapid has a flow pattern. Current accelerates through narrow sections and slows in wide ones. The fastest water runs in a clear lane or multiple lanes, depending on the rapid's shape. Identifying these lanes before you paddle through helps you stay in the strongest current (for efficiency) or avoid it (for safety, if it leads to bad holes or pour-overs). Expert boaters often speak of "the tongue", the V-shaped, relatively smooth section of water pointing downstream at the start of a rapid. The tongue marks the main current and the deepest water; staying in the tongue minimizes the risk of hitting rocks and gives you momentum to punch through features below.
Tongues aren't always friendly. A tongue can feed directly into a hole, pour-over, or rocky mess. That's why scouting matters. Watch where the tongue leads, not just where it starts. Boiling water, sudden whitewater, and irregular surface texture all signal energy you'll have to manage. Inside bends almost always have slower water; this is where sediment deposits and where paddlers can rest or scout. Learning to read the entire current pattern (lanes, speeds, boils, and eddies), turns a chaotic rapid into a puzzle with solutions.
Waves, Features, and When to Scout
Whitewater waves form when current encounters a steep drop or accelerates dramatically. Standing waves are usually friendly, they're stable, predictable features you can ride or cross. They indicate current flow, and they don't hide surprises. By contrast, boils and irregular whitewater suggest colliding currents or unstable water; these zones are harder to predict and demand attention.
Pour-overs, where water drops over a ledge, look innocent but can have significant hydraulic consequences below. A low-angle pour-over with deep water below is often passable. A steep one with shallow water and hard recirculation is dangerous. Wall-type features where both sides of the river rise sharply funnel flow into a narrow zone; these amplify current speed and can create powerful holes. Always scout drops and steep sections before paddling, especially if you're unfamiliar with the river or running it at an unfamiliar level.
Before You Launch: The Scout Walk
Reading a river before you get on the water is non-negotiable. Park, walk the rapid, and look for the big picture: Where does the current accelerate? Where does it slow? Are there obvious obstacles? What do the tongues tell you? Look for the path of clearest water and identify the hazards around it. A good guidebook or local beta helps, but your eyes are the primary tool.
Check water color and level. Clear water means you'll see rocks beneath the surface; murky water hides obstacles and suggests high flow. Checking USGS gauge data for your river before you leave home takes five minutes and provides essential context. A river at high water isn't just "the same rapid but bigger", it's a fundamentally different challenge with different lines and hazards. Finally, trust your instincts. If something looks aggressive, boils unnaturally, or feels off, scout closer or walk around. The goal isn't perfect prediction, it's informed caution and respect for the water.